
Screen Pet
Have you ever wished you had a pet to keep you company while doing your homework on your computer? In this project, you’ll create a pet that “lives” in a corner of your computer screen. It will keep you busy, because you’ll need to look after your pet to keep it happy.

What happens
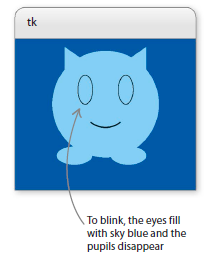
When you start the program, Screen Pet will sit there, with a little smile on its face, blinking at you. Your cute, sky-blue companion will change its expression from normal (below) to happy, cheeky, or sad, depending on how you interact with it on the screen. But don’t worry, it’s friendly—it won’t bite if it gets bored!
How it works
Running Tkinter’s root.mainloop() function sets up a while loop that keeps checking for input from the user. The loop keeps going until you close the main Tkinter window. This is also how you were able to make a GUI (graphical user interface) that reacted to a user clicking on a button or entering text in Ask the Expert.
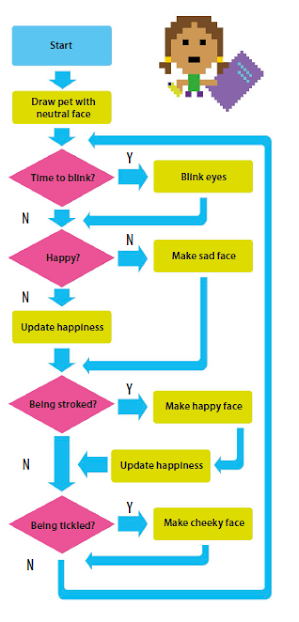
Screen Pet flowchart
The flowchart shows the sequence of actions and decisions, and how user inputs affect them. The program runs in an endless loop. It uses an ever-changing happiness variable to keep track of the pet’s mood.
Mainloop animation
You can also animate images in a Tkinter window using the root.mainloop() function. By telling it to run functions that change the image at set times, you can make Screen Pet appear to move by itself.
Draw your Screen Pet
Let’s get started. First you need to create the window where your Screen Pet will live. Then you’ll write some code to draw the pet on the screen.
1 Create a new file
Open IDLE. Go to the File menu and select New File, then save the file as “screen_pet.py”.
2 Add the Tkinter module
You need to import parts of Python’s Tkinter module at the start of your program. Type this code to bring in Tkinter and open a window where your Screen Pet will live.
3 Make a new canvas
In the window, make a dark blue canvas called “c”, on which you’ll draw your pet. Add this code after the line that opens the Tkinter window. These four lines of new code are the start of the main part of your program.
4 Run it
Now try running the program. What do you notice? The code should just show a plain, dark-blue window. It looks a bit dull and empty at the moment—what you need is a pet!
5 Get drawing
To draw your pet, add these instructions above the last two lines of code. There’s a separate command for each body part. The numbers, called coordinates, tell Tkinter what to draw and where to draw it.
6 Run it again
Run the program again and you should see Screen Pet sitting in the middle of the Tkinter window.
Blinking pet
Your Screen Pet looks cute, but it’s not doing anything! Let’s write some code to get it blinking. You’ll need to create two functions: one to open and shut the eyes, the other to tell them how long to stay open and shut for.
7 Open and close the eyes
Create this function, toggle_eyes(), at the top of your file, under the first line of code. It makes the eyes look closed by hiding the pupils and filling the eyes with the same color as the body. It also switches the eyes between being open and closed.
8 Realistic blinking
The eyes need to close only briefly and stay open for a while between blinks. Add this function, blink(), under the code you typed in Step 7. It blinks the eyes for a quarter of a second (250 milliseconds), then finishes with a command that tells mainloop() to call it again after 3 seconds (3,000 milliseconds).
9 Animate!
Put this line in the main part of your program, just above the last line. Now run the program. Your pet will come to life after 1 second (1,000 milliseconds) and sit there blinking until you close the window.
Changing moods
Screen Pet looks quite happy just now, with its little smile, but let’s cheer it up even more. We’ll give it a bigger, beaming smile and bright, rosy cheeks.
10 Make a happy face
Add this code to the part of the program that draws Screen Pet, after the line that creates the “normal” mouth. As well as a happy mouth and pink cheeks, it also draws a sad mouth. They will all remain hidden for now.
11 Show the happy face
Next, create a function called show_happy() to reveal the happy expression when you move the mouse-pointer over Screen Pet as if you were stroking it. Type this code beneath the blink() function you added in Step 8.

12 Happy moves
When the program starts, Screen Pet blinks without you doing anything. But to get it to look happy when it’s being stroked, you need to tell it what event to look out for. Tkinter calls the mouse-pointer moving over its window a <Motion> event. You need to link this to the handler function by using Tkinter’s bind()command. Add this line to the main part of your program. Then run the code and stroke the pet to try it out.
13 Hide the happy face
You only want Screen Pet to look really happy when you’re actually stroking it. Add a new function, hide_happy(), below the code for show_happy(). This new code will set Screen Pet’s expression back to normal.
14 Call the function
Type this line to call hide_happy() when the mouse-pointer leaves the window. It links Tkinter’s <Leave> event to hide_happy(). Now test your code.
.png)

0 Comments